Network Optimization for Your Edge Nodes
General Introduction
Optimizing the network for Edge Nodes (ARO Pod, ARO Link, and ARO Client) can greatly enhance performance and rewards. This tutorial explains the fundamental principles and concepts of network optimization, with suggested approaches of constructing your network connection for your Edge Nodes.
NAT
What is NAT?
Network optimization for Edge Nodes aims to improve how data travels between the node and the internet. A core principle is minimizing obstacles in the network path, often by reducing the number of Network Address Translation(NAT) layers. Fewer layers typically lead to better connectivity and performance, as each layer can introduce delays or restrictions in data flow.
The key principle here is achieving a NAT type that is friendlier to Edge Services. NAT types determine how easily external connections can reach your node. Less restrictive types enable smoother communication, which is advantageous for tasks like data sharing or cloud operations. By adjusting your network setup, you can influence the NAT type to be more open and efficient while maintaining necessary security.
Test Your NAT Type
The NAT type of your ARO node is automatically tested periodically, with the latest result displayed in the Key Metrics section on the Node Details page. You can also trigger a new test manually by clicking the Refresh button.
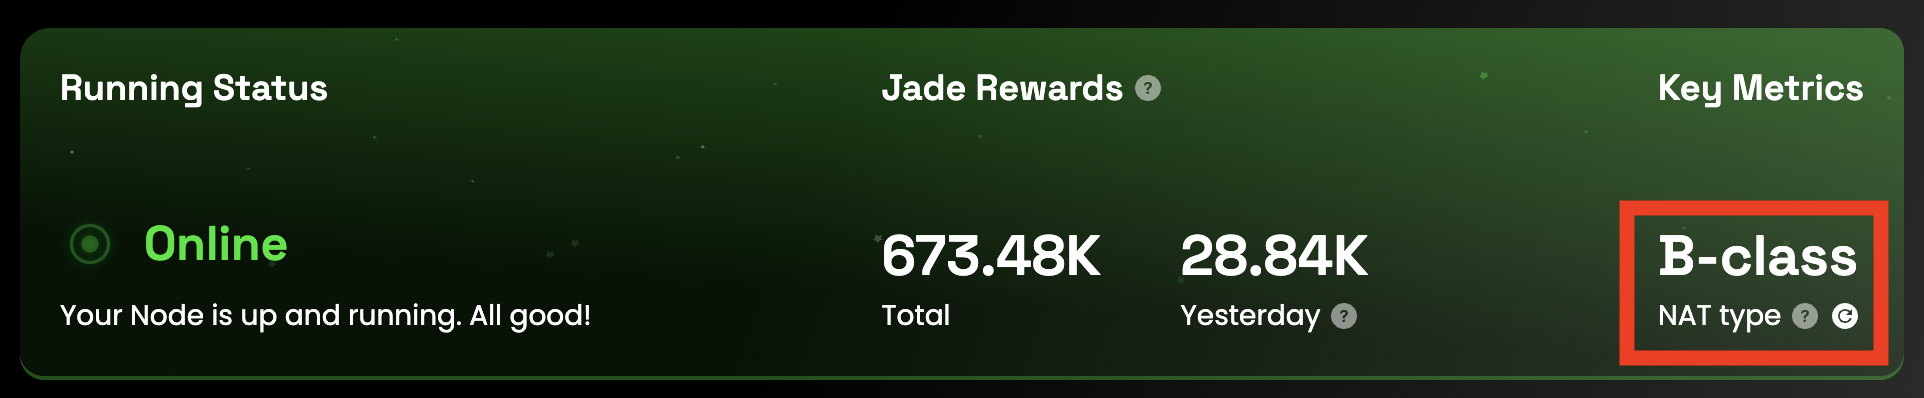
NAT types are classified into three categories:
Class A(Optimal): The best possible rating, ideal for all types of edge services. Your ARO node is operating in an excellent network environment.Class B(Suboptimal): A moderate rating with some connectivity limitations. It is generally sufficient for most edge services (such as PCDN), but upgrading to Class A will help you earn higher rewards.Class C(Poor): Unsuitable for many typical edge services due to significant network restrictions and limited node accessibility. We strongly recommend improving your network setup to achieve a higher NAT rating.
How To Achieve Better NAT Types
A simple principle is: minimize the number of NAT layers between the device and the public network to make it easier for the public network to access your device.
- The device directly obtaining a public IP is optimal;
- The device behind a single NAT device (e.g., an optical network terminal / ONT) is suboptimal;
- Other scenarios, involving two or more NAT layers, are less ideal, as node performance will be significantly compromised or edge services may completely fail to operate.
Network Optimization - Best Practices
Two Suggested Practices
Mode 1 (optimal)

Optical Networking Terminal(ONT) is the device at the end of a fiber optic network that converts the light signals from the fiber optic cable into signals that your devices can read, like routers and ARO Devices.- PPPoE on ARO Device
PPPoE, orPoint-to-Point Protocol over Ethernet, is a networking protocol that provides authentication and a secure, managed connection to the internet. On a router (or an ONT), the PPPoE setting is the login information provided by your ISP, including a username and password, which the router uses to authenticate and get a public IP address.- PPPoE allocates Public IP directly to the ARO Device, hence reducing NAT layers and benefiting ARO Device's performance.
- ONT set to
bridge modebridge modeis a network setting that disables an ONT or router's routing functions, such as NAT and DHCP. This turns the device into a simple pass-through "bridge", which reduces one NAT layer.
The Mode 1 is optimal for Edge Services because the ARO Node is allocated with a Public IP and there is no extra NAT layer introduced.
Mode 2 (suboptimal)
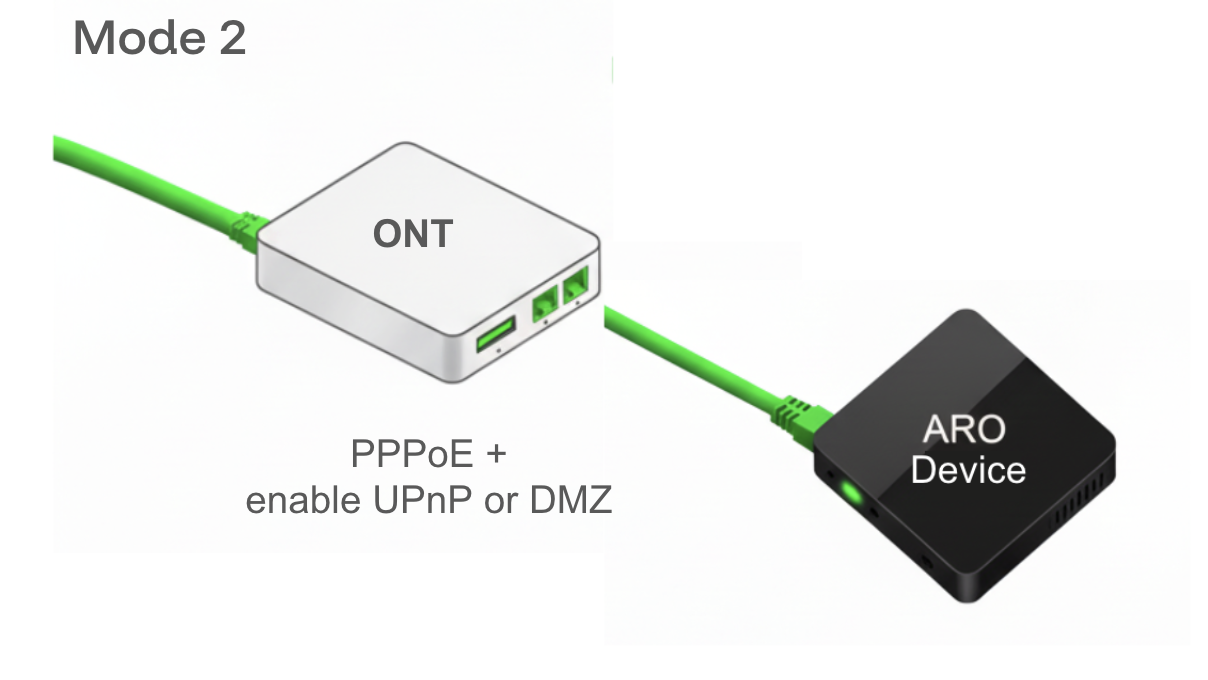
- PPPoE on the ONT
- Set UPnP or DMZ on the ONT
- The
Universal Plug and Play(UPnP) is a protocol that allows devices on your local network, such as gaming consoles or smart TVs, to automatically set up port forwarding rules without manual intervention. This can improve performance for online activities that require direct connections. - A
Demilitarized Zone(DMZ) host is a single device on your network that is completely exposed to the public internet, bypassing the router's firewall entirely. This is an extreme measure that enhances your exposure to the Internet while introduces some risks. - As PPPoE on the ONT device introduce an extra NAT layer, enabling
UPnPorDMZis favored to improve the connectivity for the connected devices in the LAN. - Warning: enable either
UPnPorDMZ. DO NOT enable both of them.
- The
The Mode 2 is suboptimal for Edge Services because only one more NAT layer is introduced and you can still connect other devices like a Wi-Fi router to the ONT.
Appendix: A Collection of Tutorials That Might Be Helpful
Tutorial - How to Set Bridge Mode on an ONT / Router
Requirements
- Admin access to ONT/router (username/password, often "admin/admin").
- Computer connected via Ethernet or Wi-Fi.
- Your own router with WAN port.
- ISP login details (e.g., PPPoE credentials) if required.
Steps
-
Access Web Interface
- Connect to ONT/router via Ethernet.
- Open browser, enter device IP (e.g.,
192.168.1.1,192.168.0.1, or192.168.100.1). - Log in with admin credentials (check with ISP if unknown).
-
Enable Bridge Mode
- Go to WAN, Internet, or Advanced settings.
- Find Bridge Mode, Passthrough, or Modem Mode.
- Disable DHCP and Wi-Fi. Save changes (device may reboot).
-
Connect Your Router
- Connect ONT’s LAN port to your router’s WAN port.
- Configure router WAN to DHCP or PPPoE (use ISP credentials if needed).
- Clone ONT’s MAC address if required. Restart router.
-
Test Connection
- Check public IP at
whatismyipaddress.com. - Run a speed test.
- Issues? Reboot devices, verify WAN settings, or contact ISP.
- Check public IP at
Warnings
- Bridge mode disables ONT’s Wi-Fi/routing—use your router.
- May void ISP support.
- Revert via ONT’s interface if needed.
Tutorial - How to Set UPnP on an ONT / Router
Requirements
- Admin access to ONT/router (username/password, often "admin/admin").
- Computer connected via Ethernet (preferred) or Wi-Fi.
- Ensure your ONT/router supports UPnP (check manual or ISP).
Steps
-
Access Web Interface
- Connect to ONT/router via Ethernet.
- Open a browser and enter the device IP (e.g.,
192.168.1.1,192.168.0.1, or192.168.100.1). - Log in with admin credentials (contact ISP if unknown).
-
Enable UPnP
- Navigate to Network, Advanced, or Security settings.
- Look for UPnP or Universal Plug and Play.
- Enable the UPnP option. Save changes (device may reboot).
-
Verify UPnP
- Connect a UPnP-compatible device (e.g., gaming console).
- Check if the device auto-configures ports (e.g., test NAT type in games).
- On the router’s interface, view the UPnP Port Mapping table to confirm active mappings.
Tutorial - How to Set DMZ on an ONT / Router
Requirements
- Admin access to ONT/router (username/password, often “admin/admin”).
- Computer connected via Ethernet (preferred) or Wi-Fi.
- IP address of the device to place in the DMZ (find in device settings or router’s client list).
- Ensure your ONT/router supports DMZ (check manual or ISP).
Steps
-
Access Web Interface
- Connect to ONT/router via Ethernet.
- Open a browser and enter the device IP (e.g.,
192.168.1.1,192.168.0.1, or192.168.100.1). - Log in with admin credentials (contact ISP if unknown).
-
Enable DMZ
- Navigate to Firewall, Security, or Advanced settings.
- Find DMZ or DMZ Host.
- Enter the IP address of the device to place in the DMZ.
- Enable DMZ and save changes (device may reboot).
Tutorial - Set Up PPPoE on a Debian System
Requirements
- Debian installed on a physical machine (e.g., Debian 11 or later).
- Admin (root) access to the system.
- Ethernet connection to a modem/ONT (configured in bridge mode if needed).
- ISP-provided PPPoE credentials.
- Network interface name (e.g.,
eth0, find usingip link).
Steps
-
Install PPPoE Software
- Open a terminal and update the package list:
sudo apt update - Install the PPPoE client:
sudo apt install pppoe pppoeconf
- Open a terminal and update the package list:
-
Configure PPPoE
- Run the PPPoE configuration tool:
sudo pppoeconf - Follow the prompts:
- Select your network interface (e.g.,
eth0). - Enter your ISP-provided username and password.
- Accept defaults for MTU, MSS, and other settings unless specified by your ISP.
- Choose to start the connection on boot (recommended).
- Select your network interface (e.g.,
- Save the configuration.
- Run the PPPoE configuration tool:
-
Start the PPPoE Connection
- Activate the connection:
sudo pon dsl-provider - Verify the connection:
Look for an assigned IP address on the
ip addr show ppp0ppp0interface.
- Activate the connection:
-
Test and Troubleshoot
- Test internet access:
ping 8.8.8.8 - Check your public IP at
whatismyipaddress.com. - Issues?
- Verify credentials in
/etc/ppp/pap-secretsor/etc/ppp/chap-secrets. - Ensure the modem/ONT is in bridge mode (see related guides).
- Restart the connection:
sudo poff dsl-provider && sudo pon dsl-provider. - Check logs:
sudo journalctl -u pppd.
- Verify credentials in
- Test internet access:
Warnings & Tips
- If using an ONT or a router, ensure it’s not also running PPPoE to avoid conflicts.
- For model-specific issues (e.g., specific ISPs or hardware), search “[ISP] Debian PPPoE setup” or provide details for tailored steps.